“Revision control, also known as version control, source control manages changes to documents, programs, and other information stored as computer files -- Wikipedia
Reproducibility?
- Tracking and recreating every step of your work
- In the software world: it’s called Version Control!
What do (good) version control tools give you?
- Peace of mind (backups)
- Freedom (exploratory branching)
- Collaboration (synchronization)
Git is an enabling technology: Use version control for everything
- Write documents (never get
paper_v5_john_jane_final_oct22_really_final.texby email again!) - Write code
- Backup your computer configuration
This tutorial is structured in the following way: we will begin with a brief overview of key concepts you need to understand in order for git to really make sense. We will then dive into hands-on work: after necessary configuration we will discuss 5 “stages of git” with scenarios of increasing sophistication and complexity, introducing the necessary commands for each stage:
- Local, single-user, linear workflow
- Single local user, branching
- Using remotes as a single user
- Remotes for collaborating in a small team
- distributed collaboration with large teams with GitHub/GitLab
Very high level picture: an overview of key concepts
The commit: a snapshot of work at a point in time Every ball in this diagram represents a commit of all the files in a code repository, that we can go later in time, compare it with. We can also add labels/tags to this commits in case we want to develop new features.
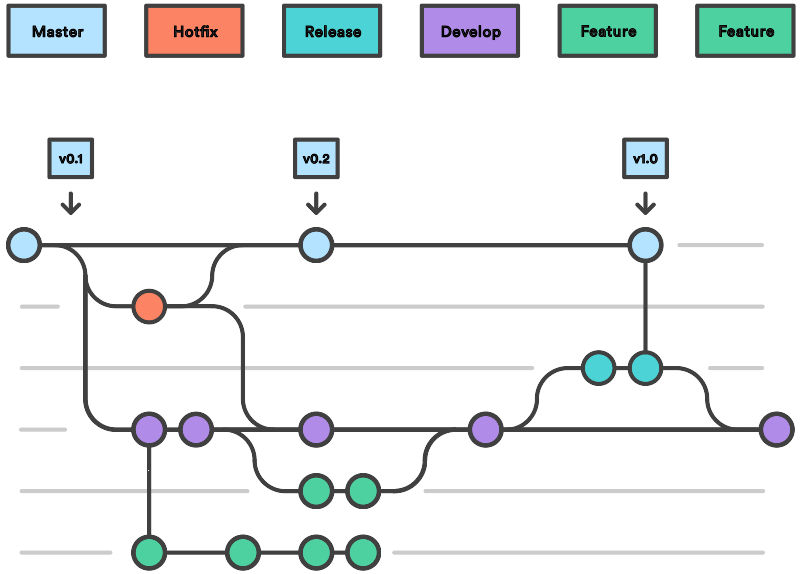
Credit: Gitflow Atlassian
And this is pretty much the essence of Git!
First things first: git must be configured before first use
The minimal amount of configuration for git to work without pestering you is to tell it who you are:
Exercise
The preceding ! marks that this code will execute in the terminal interpreter instead of in python
Lets tell Git who you are.
!git config --global user.name "joaquin" # replace joaquin by your name
!git config --global user.email "user@gmail.com" # replace user by your email
And how you will edit text files (it will often ask you to edit messages and other information, and thus wants to know how you like to edit your files):
# Put here your preferred editor. If this is not set, git will honor the $EDITOR environment variable
# On Windows: Notepad works, Notepad++, sublime or atom
# On mac/linux: vim, sublime or atom as a basic option
!git config --global core.editor nvim  # my lightweight neovim editor

# And while we're at it, we also turn on the use of color, which is very useful
!git config --global color.ui "auto"
Stage 0: Configure GIT
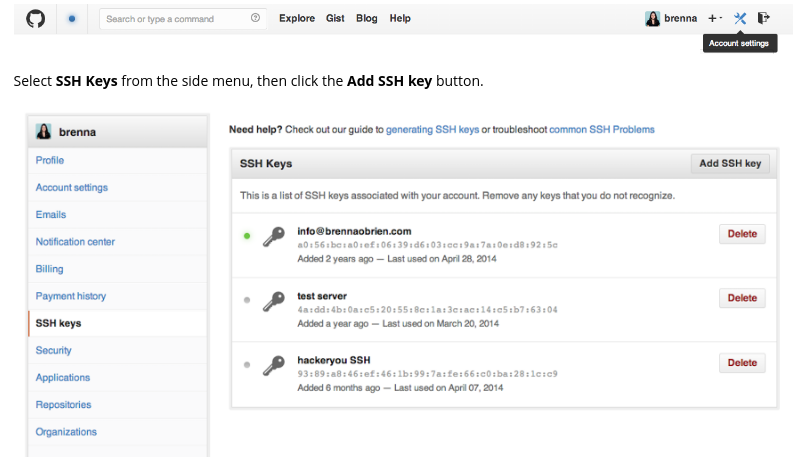
First we are going to create an SSH key that you can upload to GitHub to recognize you.
The key has a private part id_rsa that you should keep secret, and a public part id_rsa.pub that can upload to GitHub knows it’s you.
Uncomment and execute the following line, and make sure you run it only once, so only generate one key.
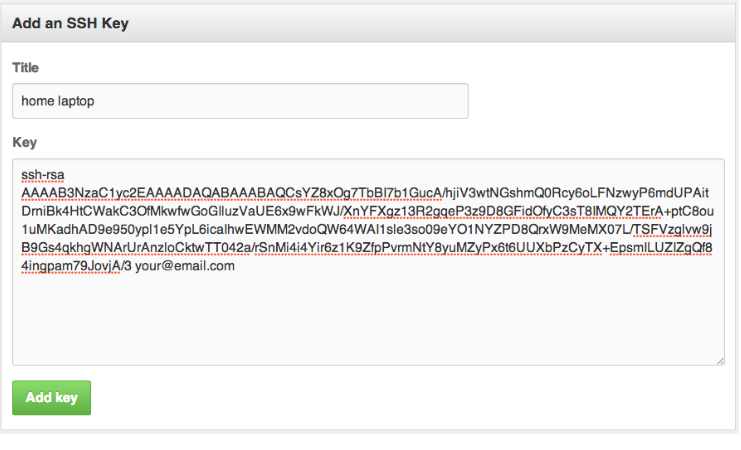
#! ssh-keygen -f ~/.ssh/id_rsa -t rsa -N ''! cat ~/.ssh/id_rsa.pubThen paste the key into your GitHub account. See doc
Stage 1: Local, single-user, linear workflow
Simply type git to see a full list of all the ‘core’ commands. We’ll now go through most of these via small practical exercises:
!gitWe are going to create a test repo for git to play
git init: create an empty repository
first we create a folder called playground_repo
! mkdir playground_repocd playground_repoLet’s look at what git did:
!ls -laThe folder is empty now.
Lets create a new repo in the folder.
! git init! ls -laNow you can see that there is a hidden folder .git (notice the dot that marks it as a hidden folder), which is the GIT repo
! ls -la .gitNow let’s edit our first file in the test directory with a text editor... I’m doing it programmatically here for automation purposes, but you’d normally be editing by hand
!echo "My first bit of text in the repo" > README.mdls lists the contents of the current working directory
!lsgit add: tell git about this new file
!git add README.mdWe can now ask git about what happened with status:
!git statusgit commit: permanently record our changes in git’s database
For now, we are always going to call git commit either with the -a option or with specific filenames (git commit file1 file2...). This delays the discussion of an aspect of git called the index (often referred to also as the ‘staging area’) that we will cover later. Most everyday work in regular scientific practice doesn’t require understanding the extra moving parts that the index involves, so on a first round we’ll bypass it. Later on we will discuss how to use it to achieve more fine-grained control of what and how git records our actions.
!git commit -a -m "First commit"In the commit above, we used the -m flag to specify a message at the command line. If we don’t do that, git will open the editor we specified in our configuration above and require that we enter a message. By default, git refuses to record changes that don’t have a message to go along with them (though you can obviously ‘cheat’ by using an empty or meaningless string: git only tries to facilitate best practices, it’s not your nanny).
git log: what has been committed so far
!git loggit diff: what have I changed?
Let’s do a little bit more work... Again, in practice you’ll be editing the files by hand, here we do it via shell commands for the sake of automation (and therefore the reproducibility of this tutorial!)
!echo "And now we add a second line..." >> README.mdAnd now we can ask git what is different:
!git diffThe cycle of git virtue: work, commit, work, commit, ...
!git commit -a -m "added second line."git log revisited
First, let’s see what the log shows us now:
!git logSometimes it’s handy to see a very summarized version of the log:
!git log --oneline --topo-order --graphGit supports aliases: new names given to command combinations. Let’s make this handy shortlog an alias, so we only have to type git slog and see this compact log:
# We create our alias (this saves it in git's permanent configuration file):
!git config --global alias.slog "log --oneline --topo-order --graph"

# And now we can use it
!git slog
git mv and rm: moving and removing files
While git add is used to add fills to the list git tracks, we must also tell it if we want their names to change or for it to stop tracking them. In familiar Unix fashion, the mv and rm git commands do precisely this:
!git mv README.md README.markdown
!git status
Note that these changes must be committed too, to become permanent! In git’s world, until something hasn’t been committed, it isn’t permanently recorded anywhere.
!git commit -a -m "I like this new name better"
!echo "Let's look at the log again:"
!git slog
And git rm works in a similar fashion removing the file from your repo.
Local user, branching
What is a branch? A branch is a label for the state of a GIT repositories. It makes it easy to develop features and go back and forth between the original main and the copy feature branch version of the files inside the GIT repo
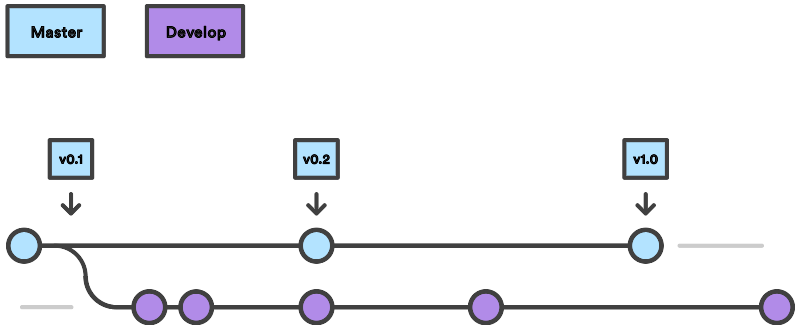
Credit: Gitflow Atlassian
There can be multiple branches alive at any point in time; the working directory is the state of a special pointer called HEAD. In this example there are two branches, main and develop:
Once new commits are made on a branch, HEAD and the branch label move with the new commits:
This allows the history of both branches to diverge:
But based on this graph structure, git can compute the necessary information to merge the divergent branches back and continue with a unified line of development:
Let’s now illustrate all of this with a concrete example.
!git status!lsWe are now going to try two different routes of development: on the main branch we will add one file and on the emojis branch, which we will create, we will add a different one. We will then merge the emojis branch into main.
!git branch emojis
!git checkout emojis
!echo "Some emojis :smile:, :horse:, :cat:" > emojis.md
!git add emojis.md
!git commit -a -m "Adding some emojis"
!git slog!git checkout main
!git slog!lsAs you can see there are no emojis file in main yet
!echo "All the while, more work goes on in main..." >> README.markdown
!git commit -a -m "The mainline keeps moving"
!git slog!ls!git merge emojis -m 'merge emojis'
!git slogUsing remotes as a single user
We are now going to introduce the concept of a remote repository: a pointer to another copy of the repository that lives on a different location. This can be simply a different path on the filesystem or a server on the internet.
For this discussion, we’ll be using remotes hosted on the GitHub.com service, but you can equally use other services like Gitlab
Let’s see if we have any remote repositories here:
!git remote -vSince the above cell didn’t produce any output after the git remote -v call, it means we have no remote repositories configured. We will now proceed to do so. Once logged into Github or Gitlab, go to the new repository page and make a repository called test. Do not check the box that says Initialize this repository with a README, since we already have an existing repository here. That option is useful when you’re starting first at Github and don’t have a repo made already on a local computer.
We can now follow the instructions from the next page:
An important aside: conflict management
While git is very good at merging, if two different branches modify the same file in the same location, it simply can’t decide which change should prevail. At that point, human intervention is necessary to make the decision. Git will help you by marking the location in the file that has a problem, but it’s up to you to resolve the conflict. Let’s see how that works by intentionally creating a conflict.
We start by creating a branch and making a change to our experiment file:
!git branch trouble
!git checkout trouble
!echo "This is going to be a problem..." >> README.markdown
!git commit -a -m "Adding a file for trouble"
And now we go back to the main branch, where we change the same file:
!git checkout main
!echo "At the same time main keeps working on same line will cause a MERGE CONFLICT ..." >> README.markdown
!git commit -a -m "Keep working on the experiment"
So now let’s see what happens if we try to merge the trouble branch into main:
!git checkout main!git merge troubleLet’s see what git has put into our file:
At this point, we go into the file with a text editor, decide which changes to keep, and make a new commit that records our decision. I’ve now made the edits, in this case I decided that both pieces of text were useful, but integrated them with some changes:
Let’s then make our new commit:
!git commit -a -m "Completed merge of trouble, fixing conflicts along the way"
!git slog
Note: While it’s a good idea to understand the basics of fixing merge conflicts by hand, in some cases you may find the use of an automated tool useful. Git supports multiple merge tools: a merge tool is a piece of software that conforms to a basic interface and knows how to merge two files into a new one. Since these are typically graphical tools, there are various to choose from for the different operating systems, and as long as they obey a basic command structure, git can work with any of them.
Git resources
this tutorial is based on Francisco Perez GIT notebook and has some ideas from the other links:
- atlassian tutorial
- Github tutorial
- tutorial on version control
- “Git for Scientists: A Tutorial” by John McDonnell
- Emanuele Olivetti’s lecture notes and exercises from the G-Node summer school on Advanced Scientific Programming in Python.
- Pro Git book
- Cheat sheet
- Git ready. A great website of posts on specific git-related topics, organized by difficulty.
- Git Magic. Another book-size guide that has useful snippets.
- port of the Hg book
Git repos
You can git clone some repositories and install the repo
Also, you can also add your fork information, git add, git commit, git push your changes and then send a pull request (request to merge your changes)
For chip design you can take a look at gdsfactory
and copy paste these lines below changing YourGithubUserName with you GitHub username
!git clone https://github.com/gdsfactory/gdsfactory.git
!cd gdsfactory
!make install
!git remote add fork git@github.com:YourGithubUserName/gdsfactory.git
For an open source PDK take a look at UBCpdk
and copy paste these lines below changing YourGithubUserName with you GitHub username
!git clone https://github.com/gdsfactory/ubc.git
!cd ubc
!make install
!git remote add fork git@github.com:YourGithubUserName/ubc.git
You can find other interesting packages in the awesome-photonics list.